Graphical user interface
The graphical user interface (GUI) of CARTA is flexible and user friendly to support most of use cases, such as continuum image analysis, or spectral line cube analysis, etc. In this section, we introduce the details of the GUI and provide examples to guide users to get familiar with configuring layouts via mouse interactions.
Components
The GUI of CARTA is classified into different components:
- main window
- menu bar
- widget bar
- panel
- tab
- floating widget
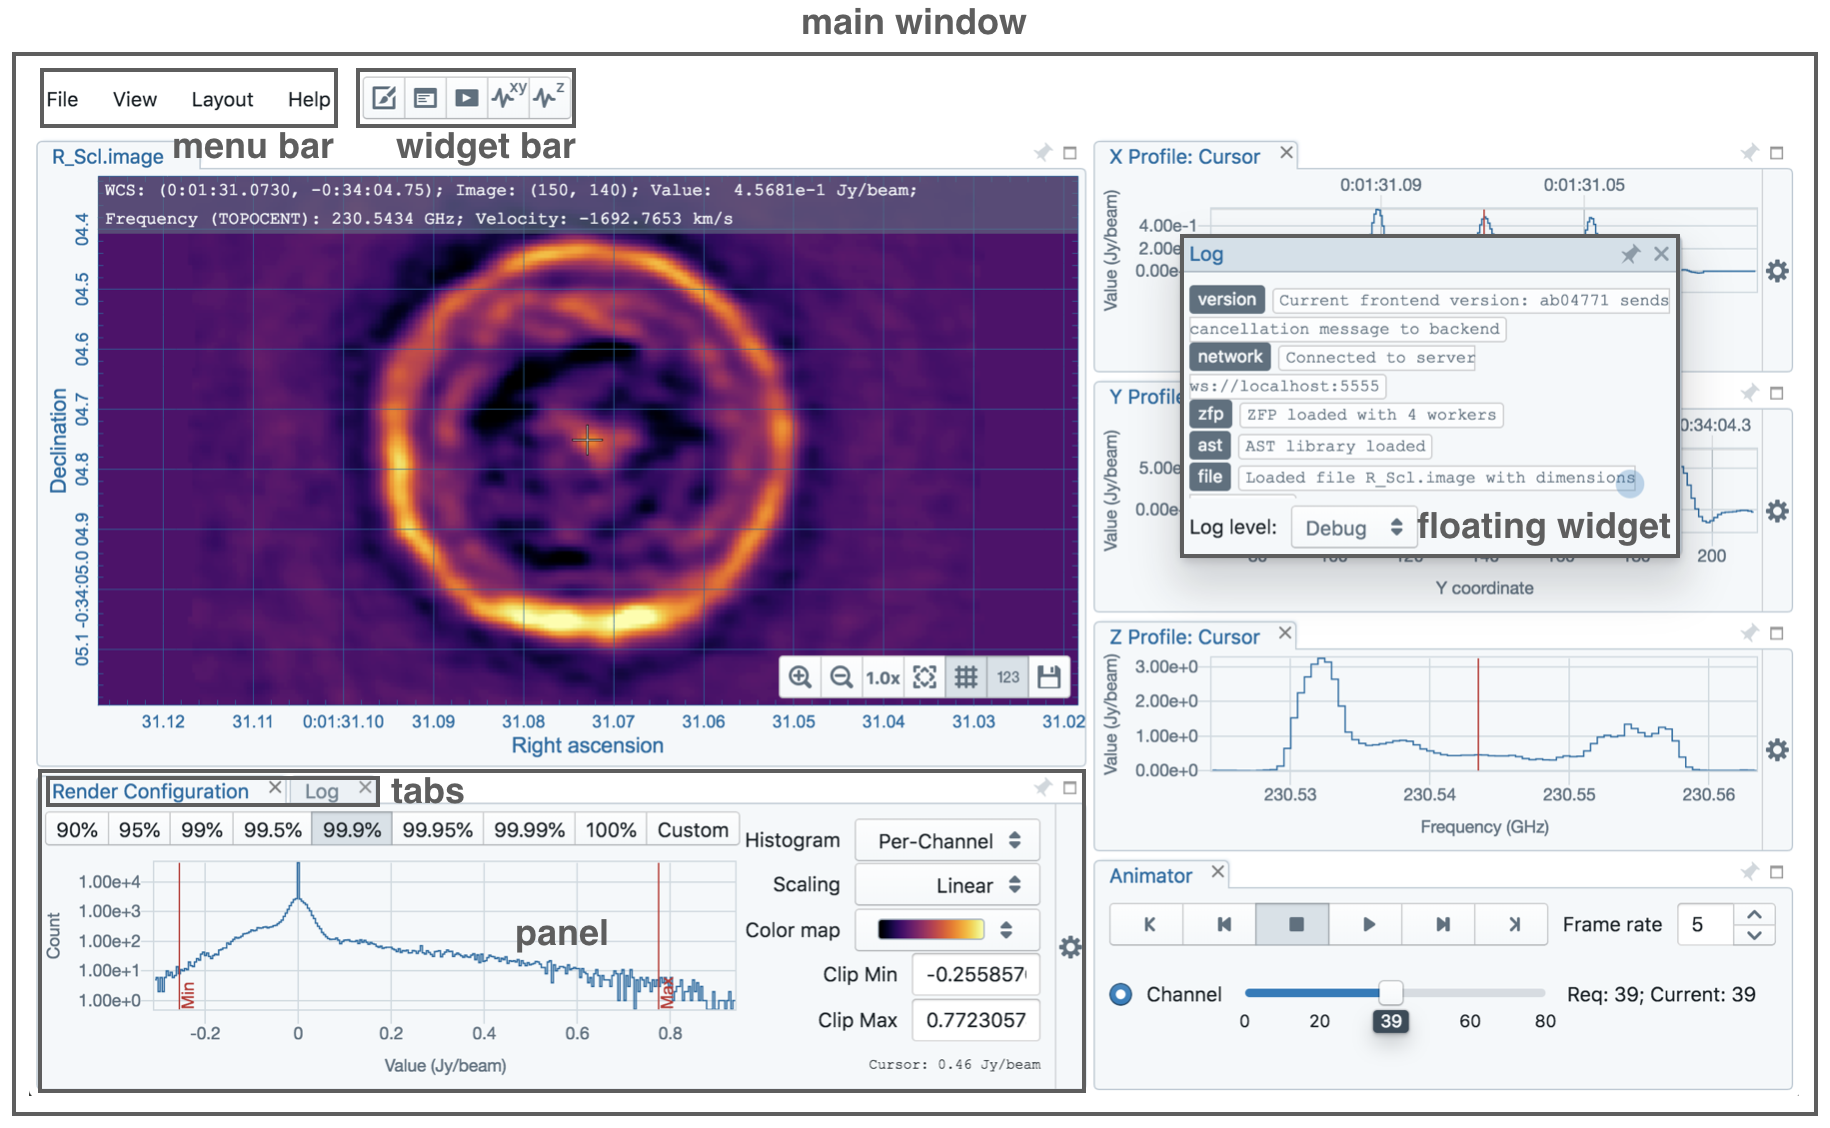
The main window consists of a set of panels and each panel may hold multiple tabs. For example, in the above figure there are six panels in the main window and there are two tabs in the bottom-right panel. A tab may be detached to become a floating widget. The menu bar provides control options, such as image input/output, launching widgets, getting helps, etc. The widget bar provides tools to view or analyze images.
Configuring the layout
The layout configuration can be changed by mouse operations, like single click or drag-and-drop. In the examples below, the drag-and-drop action is guided on the GUI with a semi-transparent rectangle. Various operations are demonstrated below.
Resizing a panel
As shown in the example below, a panel can be resized by dragging its borders. After a panel is resized, nearby panels are resized automatically to fit the new layout. Note that the appearance of the UI elements is adaptive to the size of the panel, as seen in the render configuration widget or the animator widget in the example.
Relocating a tab as a new panel
A tab can be relocated by dragging its title to a desired new panel. The target location is visualized with a semi-transparent box, as shown in the example below.
Relocating a tab to another panel
A tab can be moved to other existing panel by dragging its title to the upper boarder of the target panel, as shown in the example below.
Maximixing and restoring a panel
By clicking the maximize icon at the top-right corner of a panel, the panel (including all tabs) will be maximized to the main window. By clicking the restore icon, the panel will be restored to its original location.
Detaching and attaching a tab
By clicking the detach (unpin) icon at the top-right corner of a panel, the activated tab will be detached to become a floating widget. By dragging the attach (pin) icon, a floating window will be attached to an existing panel or as a new panel.
Creating a widget as a floating widget or as a tab
A widget is activated as a floating widget by clicking the button in the widget bar. A widget can be activated as a tab by dragging the button in the widget bar directly to a desired location.
Light and dark theme
CARTA supports a light (default) and dark theme. The theme can be changed using the View -> Interface menu item, or the shortcut shift + D.
Mouse interactions with images
Zooming
The image can be zoomed in by scrolling up and zoomed out by scrolling down.
Panning
The image can be panned equivalently by single-clicking a position in the image. The image will be re-centered at that position in the view.
Mouse interactions with charts
Zooming
A chart (profiles and histograms) is zoom by scrolling.
Alternatively, horizontal zoom, vertical zoom, and box zoom are supported.
Panning
Dragging while holding the shift key pans the chart.
Resetting range
Double-clicking on the chart resets the plotting range.
Keyboard shortcuts
CARTA supports keyboard shortcuts to enable certain controls without using a mouse. A summary is accessible via the menu Help -> Controls and Shortcuts, or the shortcut shift + ?. The shortcuts are slightly different depending on the operating system in use. The shortcuts for each operating system are summarized in the following table.
| Control | macOS | Linux |
|---|---|---|
| Help | ||
| Controls and shortcuts | shift + ? | shift + ? |
| Appearance | ||
| Toggle light/dark theme | shift + D | shift + D |
| Cursor | ||
| Toggle frozen cursor | F | F |
| File | ||
| Open image | cmd + O | ctrl + O |
| Append image | cmd + L | ctrl + L |
| Export image | cmd + E | ctrl + E |
| Frame | ||
| Next frame | cmd + ] | ctrl + ] |
| Previous frame | cmd + [ | ctrl + [ |
| Next channel | cmd + up | ctrl + up |
| Previous channel | cmd + down | ctrl + down |
| Next Stokes | cmd + shift + up | ctrl + shift + up |
| Previous Stokes | cmd + shift + down | ctrl + shift + down |